
This article is also available in Simplified Chinese.
Popular Python fine-tuning packages for large language models (LLMs), such as Unsloth and Lamini, do not support GPU acceleration on Apple M-series chips. Using MLX for fine-tuning on Mac with Apple Silicon is a great alternative.
MLX is a machine learning framework developed by Apple, specifically optimized for Apple Silicon chips. In addition to being used for training large language models, MLX also supports LoRA and QLoRA fine-tuning. However, the downside is that the current documentation for MLX is not very clear, which has caused some inconvenience or confusion for users. This tutorial addresses these issues by providing a relatively beginner-friendly fine-tuning solution.
Install the necessary packages
Install MLX and its dependencies.
!pip install -Uqq mlx mlx_lm transformers datasets- Adding ! before pip tells Jupyter Notebook to execute a system command instead of Python code. All the code in this article is executed within the Jupyter Notebook.
- -U upgrades the specified package to the latest version, and -qq makes pip almost silent during installation, only showing output in case of an error.
The additional packages required in this article are: huggingface_hub pandas matplotlib.pyplot pathlib and json. If these packages are not yet installed in your environment, please install all of the above packages first.
Load the model from HuggingFace
To directly download the original large language model, you need to have a Hugging Face account. Search for the model and go to the model card page. If you see this icon, it means that access permission is required. For example, with Meta’s Llama 3.1 model, you will see the message: ‘You need to agree to share your contact information to access this model.’ Follow the instructions and enter your contact details to obtain access.

Once you’ve obtained access to the model, go to your settings and find the ‘Access Tokens’ option. Then, create a new token, and several options will appear below. You can check the boxes according to your needs. To download the model, make sure to check [ √ ] ‘Read access to contents of all public gated repos you can access’ under the Repositories section.
After saving the token, you will receive a token in the format ‘hf_xxxxxxxx.’ Be sure to copy and save your token at this point, as it will not be displayed again once you leave the page.
Of course, you can also edit an already created token but note that every time you edit it, the token value (the ‘hf_xxxxxxxx’) will change. The previous value will become invalid, and you’ll need to update the token in your code accordingly.
from huggingface_hub import login
access_token = 'hf_DB*************lR' # paste your token here
login(access_token)
When loading the model, we can load the tokenizer together, making subsequent operations more convenient:
from mlx_lm import generate, load
model, tokenizer = load("google/gemma-2-2b-it")
For some issues regarding the MLX package, click here to view them.
Next, edit a prompt to ask the model a question and test the model loading.
prompt = "What is under-fitting and overfitting in machine learning?"

messages = [{"role": "user", "content": prompt}]
prompt = tokenizer.apply_chat_template(
    messages, tokenize=False, add_generation_prompt=True
)
response = generate(model, tokenizer, prompt=prompt, verbose=True, max_tokens = 100)
Once the model runs, you can see the provided response, indicating that the model has been loaded correctly. (The response to this question may not be complete, which is normal. To save time, max_tokens is set to 100 (the default value), limiting the length of the model output.)
Loading the dataset
Here, we are using a machine learning question-answering dataset created by combining 7 machine learning, data science, and artificial intelligence Q&A datasets from HuggingFace. The data in this dataset has been formatted according to the requirements of Gemma. If you are using a different model, make sure to check the data format required by that model first. Click here to view the dataset card, where you can also find the Jupyter Notebook used to create this dataset and use the code within to reformat the data to the required format.
from datasets import load_dataset

ds = load_dataset("win-wang/Machine_Learning_QA_Collection")
Convert the dataset to DataFrame format and check it.
import pandas as pd
train_set = pd.DataFrame(ds["train"])
dev_set = pd.DataFrame(ds["validation"])
test_set = pd.DataFrame(ds["test"])
train_set.head()
MLX requires the data to be placed in a container that allows random access. Here, we convert it into a Python built-in list:
def preprocess(dataset):
    return dataset["text"].tolist()

train_set, dev_set, test_set = map(preprocess, (train_set, dev_set, test_set))
At this point, we have prepared the training set, development set, and test set.
Model fine-tuning
Load the relevant packages.
import matplotlib.pyplot as plt
import mlx.optimizers as optim
from mlx.utils import tree_flatten
from mlx_lm import load, generate
from mlx_lm.tuner import train, TrainingArgs
from mlx_lm.tuner import linear_to_lora_layers
from pathlib import Path
import json
Create a directory to save the adapter configuration and weights.
adapter_path = Path("adapters")
adapter_path.mkdir(parents=True, exist_ok=True)
Set the LoRA parameters.
lora_config = {
 "lora_layers": 8,
 "lora_parameters": {
    "rank": 8,
    "scale": 20.0,
    "dropout": 0.0,
}}
Save the LoRA configuration to the adapter path.
with open(adapter_path / "adapter_config.json", "w") as fid:
    json.dump(lora_config, fid, indent=4)
Set the training parameters.
training_args = TrainingArgs(
    adapter_file=adapter_path / "adapters.safetensors",
    iters=200,
    steps_per_eval=50
)
First, freeze the base model.
model.freeze()Convert the linear layers to LoRA layers.
linear_to_lora_layers(model, lora_config["lora_layers"], lora_config["lora_parameters"])Check the trainable model parameters.
num_train_params = (
    sum(v.size for _, v in tree_flatten(model.trainable_parameters()))
)
print(f"Number of trainable parameters: {num_train_params}")
Set the model to training mode.
model.train()Set the optimizer.
opt = optim.Adam(learning_rate=1e-5)Build a class to record the data during the training process.
class Metrics:
    train_losses = []
    val_losses = []
    def on_train_loss_report(self, info):
        self.train_losses.append((info["iteration"], info["train_loss"]))
    def on_val_loss_report(self, info):
        self.val_losses.append((info["iteration"], info["val_loss"]))

metrics = Metrics()
Put in all the parameters and start fine-tuning.
train(
model = model,
tokenizer = tokenizer,
args = training_args,
optimizer = opt,
train_dataset = train_set,
val_dataset = dev_set,
training_callback = metrics
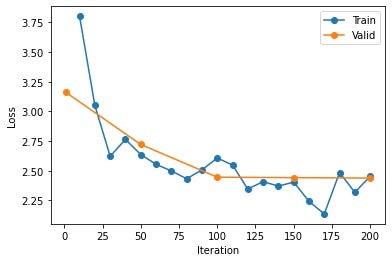
)After fine-tuning, plot a line chart showing how the loss value changes with iterations.
train_its, train_losses = zip(*metrics.train_losses)
val_its, val_losses = zip(*metrics.val_losses)
plt.plot(train_its, train_losses, '-o')
plt.plot(val_its, val_losses, '-o')
plt.xlabel("Iteration")
plt.ylabel("Loss")
plt.legend(['Train', "Valid"]);
You will get a graph similar to this.
If you know exactly the iterations and other parameters you want, you can use a shell command to fine-tune directly.
For example:
!mlx_lm.lora --model google/gemma-2-2b-it \
    --train \
    --iters 200 \
    --data data
Use the parameters from the original model and adapter file to build the LoRA model.
model_lora, _ = load("google/gemma-2-2b-it", adapter_path="adapters")Let the fine-tuned model answer the previous question again.
generate(model_lora, tokenizer, prompt=prompt, verbose=True)Perplexity calculation
The model used here does not make meaningful perplexity calculations. If your fine-tuned model can calculate perplexity, you can use the following code:
Where adapter-path and data are the storage paths for the adapter and data, respectively.
!mlx_lm.lora \
    --model  'google/gemma-2-2b-it'\
    --adapter-path "adapters" \
    --data "data" \
    --test
Fusion
For easier use in the future, we can also fuse the fine-tuned parameters with the original model, by default using the files saved in the adaptes directory in the current working directory.
!mlx_lm.fuse --model "google/gemma-2-2b-it"At this point, the fused model will automatically be saved in the lora_fused_model folder in the current working directory.
If you need to customize the path and save location, you can use the following parameters:
--model # The path to the local model or the model on HuggingFace
--save-path # The directory where the fused model will be saved
--adapter-path # The directory where the trained adapter and weights are saved
You can also use <mark style="background-color:var(--ast-global-color-4)" class="has-inline-color">--upload-repo</mark> and <mark style="background-color:var(--ast-global-color-4)" class="has-inline-color">--hf-path</mark> to directly upload the trained model to HuggingFace, for example:
!mlx_lm.fuse --model "google/gemma-2-2b-it" \
	--upload-repo "Your repo" \
	--hf-path "google/gemma-2-2b-it"
<mark style="background-color:var(--ast-global-color-4)" class="has-inline-color">--hf-path</mark> is used for attribution and model version control.
Click here to view and download the complete Jupyter Notebook.